Pages

Tuesday, October 30, 2012


 I hope everyone had a great weekend! (It is now Tuesday, but I had planned to post on Monday, just ran out of time!) 

Ours was BUSY!  TJ & I went to our 25 year high school reunion on Friday.  We had so much fun catching up with everyone!  We stayed in a cute little bed and breakfast in Cedarburg, WI.  We both grew up minutes from Cedarburg, but never appreciated the town until we moved away.  (ok, I appreciate it more than TJ)  We spent a great Saturday morning checking out the shops. 
 
Funny thing is a few days before we went to Cedarburg I got this in the mail:


In this November/December issue there was an article about Cedarburg. 
 
 
This first picture looks like a Christmas story book or a post card!  The building on the far right is the Washington House Inn.  That is the B&B we stayed at.  Our rooms was right above the two front doors, so we had a great view of the beautiful street!  Next door there is an awesome little shop that has amazing candy apples!  


Christmas in Cedarburg is beautiful!


See the sign at the top that says tea by the glass?  We stopped in this store, it is called Weeds.  I fell in love with this shop!  When we first walked in we were offered a hot cup of tea.  It was the perfect thing for a cool morning!  The store has jars and jars of herbals teas.  If anyone watches the show Grimm  (one of our favorite shows) it reminded me of the Spice Shop!  :) Anyways, they had a tea for anything that ails you!  I bought a few different herbals teas, and they are awesome! Actually enjoying them more than my usual coffee!
 
Everything is natural, organic, recycled, etc.  I also bought some of their natural soaps and those are great as well.  It was such a neat shop!
 
 
I also found a great shop that was right up my alley.  It is called Stacia's.  Kind of like a flea market store. We walked in and TJ said it looks like a store I would have!  Maybe some day!!
 
Cedarburg also has a one screen theater called  the Rivoli.  As kids,  this is where we went for movies for $1.00.  This is how it looked back then:


Mark Kokta


 It is a bit more fancy now!


Cedarburg also has the Cedar Creek Winery.  We love to stop in there to wine taste! 

You can also find cute places to eat, have coffee, shop, etc.

Funny how soooo many years later coming back to Cedarburg makes us feel like we are someplace far away.  Not a town we grew up next to!  I am looking forward to my next trip back!  :)


Thursday, October 25, 2012

On a chair hunt.....

 
Do you ever notice that one project can snowball in to many many more projects?? That is basically the story of my life!  I guess that is why I named my blog my ever changing home! 
 
After I re finished my kitchen table I decided to mix up the chairs a bit.  The first thing I did was post my old chairs on craigslist.  In the past I would have just bought new ones, but the new me is trying to do things the smarter less wasteful way. 
 
I started off by listing the 4 black leather chairs around the table and they sold the next day!  Now I just listed the black leather bar stools.  I decided to just start fresh!  I also listed another 6 chairs I had in our basement that were sitting there doing absolutely nothing! 


In the meantime I took a trip to Carter's Cottage. I went for paint and came home with these.


There was just something about these little antique chairs!  Most of the furniture in Carter's Cottage is painted in Annie Sloan paint, so when I saw these chairs just screaming to be re done I had to get them.  I paid only $35.00 for the pair! 
 
I also got my paint.....
 
First I bought Graphite...


Graphite
Graphite is a soft black made with purplish blues and brown and is not completely black. When waxed it becomes a beautiful black like dark slate.
 
I am so excited to try this color.  This is what I have planned for those two little chairs.
 
Carter's Cottage is now selling ascp in smaller 4 oz pots for $14.95 each.   Perfect way to try out a color!
 
So....since I have been wanting to try Barcelona Orange since the day it came out this was the perfect way to do it!


Barcelona Orange
Think of a large ripe orange and this is the colour of Barcelona Orange. Apply dark wax and the colour becomes a luscious burnt orange. Its warmth and vivacity is a great accompaniment to neutral tones such as our greeny sludge colour, Chateau Grey or to the cool silveriness of Paris Grey as well as Aubusson Blue, its deep complementary partner. It is perfect for many interiors but particularly with the 1960s vintage look


I also love Duck Egg Blue and I am not sure why I have not purchased it before.  It is a beautiful color.  I am thinking of working it in with the Graphite on the chairs somehow.


Duck Egg BlueA greenish soft blue reminiscent of Rococo French and Swedish interiors. It looks wonderful and fresh with Old White, used over Chateau Grey and Aubusson Blue
 
 
So now I have two new (old) chairs to work on, some fun paint to try out, and a kitchen table with no chairs. 
 
In my mind I am seeing a mix of industrial and vintage??  Two of my favorite looks!  Stay tuned.... :)


Sunday, October 21, 2012

Refinishing an oak table-part II


Happy Sunday!  We are having absolutely beautiful weather today.  70 degrees and sunny!  Just perfect!  Smells like fall too!
 
We had a busy weekend with football games, baseball games, more sleepovers, haunted houses, church, and today I snuck away and went to Carter's Cottage.  I needed more paint!  I got some great colors that I can not wait to try. I will share them soon!
 
Anyways here is my finished table....
 
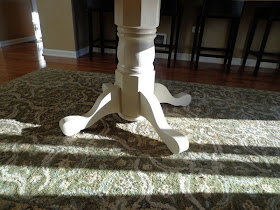
  I painted the pedestal base with Annie Sloan Chalk Paint in Old Ochre.  I added water to the paint before the 2nd coat and it went on so nicely.  I have never tried that before.  I was running low on paint so wanted to make it last. I was told that because the paint is thick watering down the second layer is suggested.  I never knew that!  It really worked great.  After two coats of ASCP I did a layer of clear wax. 


 Here is the finished table.  (sorry about the bright sun!)


I am thrilled with how it turned out. I love that I was able to repurpose a table that was very special to us!  I was really nervous for awhile at how it was turning out. What is nice about wood is you can just re sand and start over if you need to.  Although that makes for a much larger project!

 
Notice something missing in the pictures?  Chairs!  I decided to switch up the chairs a bit.  I want to do something different but just have not quite figured it out yet. 
 
I found two awesome antique chairs today that I am going to re do and add to some other chairs.  Just not sure which ones yet...... :)


Saturday, October 20, 2012

Refinishing an oak dining table.....

 
Well, it has been awhile since I posted. I have been swamped with projects and work and have not sat down to blog.  I have been showing a lot of homes this week!  Love that!  I also have sold every table so far that I have re done!  I even sold our kitchen and our dining room table.  (more on that another time...) It has been a little nuts. 
 
 
One of the big projects I have been working on is refinishing our old oak table.  TJ and I bought this table about 20 years ago and it was the first "nice" piece of furniture we ever bought.  It has held up very well, two little kids did not even put a knick in it!  When we moved in this house it became a game table in our loft and then eventually moved down to the basement.  After all that it is still in excellent condition. 


SO.......I decided any table as sturdy as that deserves to stick around. I was not thrilled with the honey oak color any longer so decided to refinish the top and paint the pedestal bottom.


**see that scratch?  We had this table only a short while and were still being very careful with it.  We were in the process of putting our house on the market and had a mortgage lender coming to our home.  He put his big file folder on the table and put that scratch in it!  I was sooo upset!  Kind of funny to think of that so many years later!
 
OK back to my project....
 
I have done small wood refinishing projects before so figured this would be easy.  WRONG.  This was one of my hardest projects to date. 
 
 
I had purchased a palm sander a few months ago so decided to use that.  I could have used a chemical stripper first but decided I would rather just sand away.  So sand away I did.  It took forever!!  It was also very messy!


A few things I learned about sanding.  It takes a lot of patience if you want it done well.  First the coats of polyurethane came off.  After that the honey oak colored stain.  Then I was down to the bare wood.  I started with a heavier grit sandpaper and finished with a fine grit to smooth the surface.  This part was tedious but it was the easiest part.


After I was sure I had it all sanded evenly I vacuumed the table really well and then wiped it down with a cloth.  Now I was ready to stain!


I decided on Varathane Stain in Espresso. I wanted it nice and dark. I thought this was going to be the easy fun part. WRONG again. I made sure I bought a good stain brush and went to work.


This is after one coat of stain.  Uneven and blotchy, but it was only the first coat.
 
 
After two coats of stain it was still blotchy and uneven!  Worse actually!
 
Now at this point you will not get anymore progress pictures.  This project stressed me out and I could not even think of taking pics of it!
 
Next I went to Menards and asked why I was having such a problem getting the stain even.  They told me that with oak it should stain evenly without using any wood conditioner but to go ahead and try it to see if it helps.
 
Only two of the leafs were really bad so I completely sanded both those down. Ugh!!!  Again no pictures!  I was too mad.  After I cleaned the bare wood I applied the wood conditioner and let that dry a day.
 
I re stained it again the next day only this time used a foam brush which seemed to work abit better.  I was finally ready to bring the table inside.
 
WELL a few hours later two really light spots appeared again and I almost cried.  I was so over this table! 
 
My son is in woods class at school and went and got a paper towel and applied stain to the two light areas and wow!!!! It worked!  No idea how that made the stain darken that area and I don't care.  I am just so happy it worked!
 
I then applied 3 coats of semi-gloss poly.  I lightly sanded in between each layer with 220 grit sandpaper.  I let each application dry 24 hours. 
 
Well, this was probably was of my wordiest blogs yet.  Sorry about the lack of pictures.  This project got the best of me.  Probably not the best week to start it when I was pressed for time as well.
 
Stay tuned for more pictures of the finished table!  It actually turned out pretty great!


Friday, October 12, 2012

More candle ideas!


I love Annie Sloan Chalk Paint.  I especially love the color Florence.  I think it looks amazing when the base color is black and it is distressed to show both colors.  I have been looking for something to paint this color in my home. 
 
Here is how Florence is described by Annie Sloan:
 
 
Florence - LIMITED EDITION
This is inspired by the colours of the copper green mineral and semi-precious stone, malachite, and from the same family of stones as azurite and turquoise. In the 17th and 18th century it was used as a colour made with verdigris but as it is a very fugitive colour turning black with time so we are not aware of how it was used on woodwork in many houses. It is a classical colour found in classical Italian furniture.


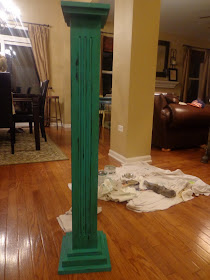
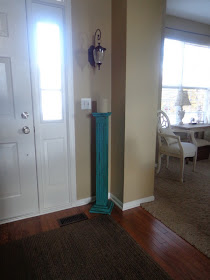
I decided on this big black candle stick.  My sister Kim gave this to me many years ago.  She had no where to put it so I took it and stuck it by my front door. 


 This was a perfect Bears game project!!  I can watch the game and get something done at the same time! 
 
 Cubby loves to watch my projects!  :)


I used two coats of Annie Sloan in Florence.  Then I used a wet scotch bright pad and sanded it heavy.  I wanted a lot of the black to show through.  I protected it with a coat of the clear wax and then a thin layer of the dark wax. 
 
I love how it turned out!!!!
 
I then decided to spice up the boring white candle I had on it.
 
I saw these candles at Pottery Barn. ($16.50-$29.50) I like the burlap texture.


SOOOOOO since I had leftover burlap and a hot glue gun I decided to make my own.  I like the real burlap better anyways!


Pretty simple project.  Cutting burlap straight can be a challenge though.  If you pull one of the strings where you are going to be cutting your line, it makes its own line in the fabric.  Then you can just follow that line and it helps!!


So easy and so FREE!!!  I made a few extras I liked them so much!


Close-up of Florence with black underneath.


Loving the pop of color!!


Have a great weekend everyone!!!


Thursday, October 11, 2012

Dressing up your candles.

 
DYI twig candle holders.....
 
 
I saw this idea on Pinterest and could not wait to try it. 
 
 
blogfossil


I had a few projects going on that day, so my house had stuff everywhere!  (nothing new!!)  So I found a little spot on the carpet to work. 


I already had everything for this project.  The glass candle holder is from Homegoods.  This is the best store to find these.  They usually have several sizes and they are a few dollars each.  The glass is also really thick and nice.


Next I needed sticks.  I had these silver ones already too.  They are cut from our red twigged dogwood.  I cut them last fall and spray painted the sticks silver to put in my Christmas pots.  I have used them for several things since.  I just cut them to the size of the glass candle holder, I did not measure since I wanted them all a little different.


This project was a little too messy for working on the carpet so I moved to the kitchen!  Hot glue works perfect for this. The blog says to use e-6000 but when I did this the sticks kept sliding down.
 
 I just randomly glued the sticks around the glass.  (while my son was next to me applying to colleges, this project was very therapeutic for me!!  :)


You do not have to try that hard to fit the sticks to each other.  It is best if there is a little space so you can see the candle flicker.  Makes it cozy!!


I knew the perfect spot for this little candle.  I had a candle break on our tub when I was cleaning it,  so this fit in that spot perfectly.  The silver goes great in there too.


I plan to make a few more of these.  Once the leaves are all off our trees I would like to do some with the natural twigs and do some different sizes too.  It would look awesome as a table centerpiece for Thanksgiving!! Also I love the idea of a few on the fireplace mantel!
 
You can have fun with this little project!


Monday, October 8, 2012

Kane County Flea Market!


Happy Monday!!  Hope everyone had a great weekend!  Ours was packed full of football games, baseball games, TJ running part of the Chicago marathon to cheer on his friend, birthday parties, lots of sleepovers, our anniversary and The Kane County Flea Market!  (it was a 4 day weekend here so we were able to pack all that in!) 
 
On Saturday TJ and I celebrated 22 years together!  We are going to go away in a few weeks, this weekend was just too busy.  Our day was spent getting up bright and early for Brady's baseball game.  There was a 2 hour break before his second game AND  lucky for us the flea market was only 10 minutes away! 
 
This was probably my quickest trip to a flea market, but we still managed to see everything.  It helped that there was not a lot of vendors there.  Not sure why.


TJ could not wait to get in there!!!!  :)


I am starting with the gross stuff.... I have never seen this before!  They sell animal parts!!  Some animal parts say high quality & some say low quality.  All kinds of animals and all kinds of parts.  Maybe I am missing something, but what would you do with these???


Ewwwww!


How cool is this?!


A dirty old bathtub? 


Pretty painted frames!


I love all the old fans.  I was almost tempted to get another one. 


Absolutely LOVE this table!!!!


Visions of the lady chasing me yelling that I stole her washboard haunted me!!!


Beautiful kitchen island.  Even comes with a man drinking a coke!!


I thought this was a cute idea for an old ladder!  The candles are flameless. 


I had this exact hanging light in my bedroom growing up.


This old dresser says make an offer on it.  The more I look at it, it is pretty neat!


I love fall!


We have a pile of these at home!!


I thought this display was so pretty.  I love the wire baskets over the candles. 


 I would really like to buy some of these but the prices are crazy high!!


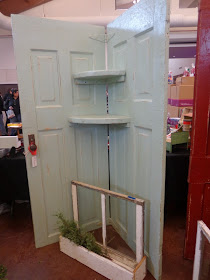
This door caught my eye.  It is labeled a door shelf and it was SOLD.  I am not sure about this, maybe a few more shelves?


Very cool metal table and blue chairs!


Awesome blue industrial cart!


Even though it was a quick day, I managed to find a few things.  I fell in love with this little vintage table.  It is from the 1920's.  The wood is in excellent condition.  TJ spotted the milk glass bell, so cute!  Also I had to get another soy candle, these are the best I have found!
 
Not too bad for a quick trip!!